Friday, January 13, 2017

Torrent Nose Cone Payload Modification

My 4" diameter Madcow Torrent has become quite a workhorse for various learning experiences and electronic payload tests. Now that I'm doing some dual-deploy flights, I though it might be useful to add a payload section in the large nose cone.

My general idea for the design was to make some plywood centering rings to epoxy in a BT-70 tube, and make it so that I could have two all-thread rails to hold a sled, or else just cap off the end of the section after stuffing whatever I want in there.

A lot of this was made possible by the access to, and help with, the laser cutter at Boulder Public Library's BLDG61 - so lots of thanks to the super friendly and helpful folks there.

Parts

The parts, all cut and gathered together (not including hardware), are shown below.


The BT-70 tube is held in place by the two large rings to the right (from 1/8" plywood), with the smaller of the two going forward in the nose, and the aft ring being mounted flush in the shoulder.

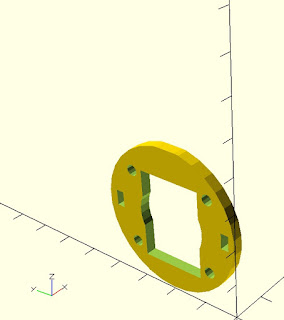
The other pieces (in 3/32" ply), shown in this design view, are used to form the ends of the payload bay. Each end consists of two pieces. An "I" in the label means it fits inside the BT-70, and an "O" means it matches the outer diameter of the BT-70. Mated together, each set forms a nice, easy to center cap for an end of the tube.


  • FI and FO are for the forward end.
  • AI1 and AO1 are for an aft cap that can be bolted on without the use of rails.
  • AI2 and AO2 are for an aft cap that is held on by two rails.
  • The unlabeled rings are used to make an adapter so I can fit a BT-60 tube in the payload, since a recent version of my rocket tracker fits into a BT-60.
Additional hardware needed:
  • 6-32 all-thread rod, approximately 20" depending on the exact bay length.
  • Two 6-32 T-nuts.
  • Two 6-32 threaded inserts.
  • 6-32 nuts, bolts and washers (two each).
  • Two eye bolts, with matching nuts and washers.
  • Epoxy
  • Wood glue

Assembly

First, I aligned and glued FI and FO together, then inserted (and epoxied in place) two 6-32 T-nuts. These will allow me to insert, and also remove, the all-thread rods. Note that the large part of the T-nut will be away from the BT-70.


On the forward centering ring, I added a couple small square pieces of plywood to help hold two 6-32 screw-in threaded inserts, which I also reinforced with epoxy. These will be used to bolt on aft cap A1. The two small open holes will be used for eyebolts.


Next I glued the fore and assembly onto the BT-70 tube.


Then the forward centering ring. Note that I included some holes incase I ever put an altimeter in there (though I'm not putting a matching hole in the nose cone at this time).


The two pieces of A2 were matched and glued together. This photo shows how they will be held on to the bay with the all-thread rods.


Next I bolted and epoxied the eye bolts onto the aft centering ring.


Now, I cut off the end of the end of the nose cone, leaving as much of the shoulder in place as possible. I then epoxied in the BT-70 assembly on just the forward end, while using the aft centering ring (unglued at this time) to keep it in position.


Finally, I epoxied in the aft centering ring securely, then trimmed off the excess BT-70 tube. The nose cone is all set to go. I can choose to close up the bay with either A1 (cap with no rails) or A2 (rails) - though I have not yet designed or made a sled for A2.


Overall, the modifications added 103g to the 186g nose cone (with the A1 cap). Kind of a lot, but let's face it - Torrent is already a heavy beast not exactly optimized for weight.

As of this writing, I've not yet flight tested it. I have some concerns about the smallish eyebolts holding, especially if the payload adds any significant weight. I will probably do one or two initial tests with dead weight in the payload, instead of expensive electronics.

4/23/17 update: I did the first flight test withe the modified node cone on 4/23 at Tripoli Colorado's 4/23 launch. Just in case, I substituted dead weight for electronics. Everything was handled perfectly, so the next opportunity I have I'm going to do a launch with a larger I motor and include my custom built GPS tracker in the payload.


Saturday, January 7, 2017

Rocket Tracking Payload, v2


Stunning to see that I haven't made a new entry in this blog in over two years. Stunning to me, that is. Not so much to my readership, which has ballooned from zero to... zero.

But this is serving the exact purpose I intended, which is to provide a way for me to look back on my growth and progress in the hobby. In the past couple years, I've gotten more experience with HPR, done my second high power build (a Sirius Eradicator), attended many launches with NCR (now as a member) and other Colorado clubs, and had a few attempts (one - finally - successful) at electronic dual deployment with my Torrent. But of course, I've not done nearly as much as I would've liked. Never will.

One project that I have been working on, slowly, is a new version of an Arduino and Xbee radio based tracker and data logger. I'd previously written about my first version, used successfully several times in Torrent. This new version is essentially the same concept, but the goal was to make something more compact so that I can do more launches inexpensively, testing and improving each time.

The Design

Specifically, the hardware differences in this version are:
  1. I took out the barometric pressure sensor and the accelerometer. This was just for simplicity on this initial go. I've come to realize how essential these are and will be adding them back in.
  2. The Arduino Pro Micro has been replaced with a Fio v3 from SparkFun. This unit has a place for the Xbee to plug right in. 
  3. I've swapped out the GPS with this inexpensive unit, also from SparkFun.
  4. I'm now using a 1000 mAh LiPo battery.
I've got all this packed into a 3D printed holder that I created, which has everything fit nicely into a BT-60 payload space about 4 inches long.

The Fio is a nice package, as it integrates a LiPo charger. The one challenge I had with it is that the pin assignments for SPI seem to be messed up, so I had trouble initially getting the SD card to work. I eventually solved the problem by editing the pins_arduino.h. Useful info on the issue is here.

The 3D printed enclosure, designed in OpenSCAD, was a fun part of this project. It took me several iterations to get the fit just right. Still, it is not perfect. It consists of three parts, and in order to cram in all the components and hold it together solidly, there are a couple M3 screws that I use. These are probably not necessary, as the payload bay tube walls will certainly keep things together. The drawback that I realized later is that the enclosure does not allow access to the USB charging port on the Fio, so the unit has to be disassembled in order to charge the LiPo through the Fio.


Here's what it look like when assembled with all components:


As my test platform, I custom-desgined a rocket with a suitable payload bay. It has a 24mm motor mount and plywood motor mount with through-the-wall basswood fins. My intention was to make it sturdy enough to handle Aerotech single use F motors, but still fly on (relatively) inexpensive Estes black powder E motors.


The results so far...

Doing ground tests with the transmitter/receiver pair (XBee Pro 900 XSC S3B, wire antenna in transmitter and RPSMA antenna on receiver), I got a quarter mile range in my hilly neighborhood. Hopefully on a large flat rocket range it will be better. 

My first flight tests involved flying the rocket with a dead weight payload having the same mass as the electronics, just to make sure that was OK. I did two flights, using an Estes E9-4 and an Aerotech F32-6T. Both perfect, with the F motor taking it to over 2100 ft, and eventually landing 0.6 miles from the launch rod (it has a 24" nylon chute). I wished the payload had been in and working for that flight! Exactly the sort of thing I want for testing.

The first test flight with the payload, at the SCORE launch on November 5th, technically went perfectly, but the results obtained were downright odd. The GPS data, particularly the altitude portion, did not seem to correlate well with the observed flight. In particular, the altitude profile showed two distinct peaks. Since I had no accelerometer on there, and I didn't note the exact time of launch, it was hard to tell from the data when the actual launch and landing took place.

The second test flight had different issues, though the electronic payload did its job. At the last minute, I decided to clip in my Jolly Logic 2 altimeter so I'd have data to compare. It seems that when I did this, I did not re-connect the main booster section with the upper payload bay and nose cone assembly (normally held together by a small quick link). Oops. The rocket took off and weather-cocked SE, as did most flights that day. After ejection, the main booster, still attached to the parachute, drifted about a quarter mile NW of the pad. I lost contact with the tracker shortly after ejection.

Here's where a shortcoming in my receiver came back to bite me. While it records everything it receives on a local SD card, I was short on time, and didn't include a feature to show me the latest valid GPS position received. So once I lost contact, I had nothing. I should've paid more attention to my ground test results and implemented this feature.

Nevertheless, I located the rocket rather quickly, and that is when I discovered that the payload section, with the nose cone and Jolly Logic, were missing. Upon inspection I realized my mistake, and that the missing components must've separated at ejection and would this be in the tall grass to the SE of the pad. My assumption at that point was that the payload stopped transmitting on impact. We spent a bit of time searching the suspected area for the payload, but no luck.

Returning home, I popped the SD card out of the receiver and into my computer to look at the data that was received. As I'd hoped, it showed a track ending right to the SE.


I returned to the launch site the next morning, and found the entire assembly in about 10 minutes. The body tube was cracked, but the payload was undamaged, and upon further inspection at home I determined that the electronics were still in working order. The only issue I saw was that the SD card seemed to dislodge on impact.


The other thing I've noted is that the altitude reading from the GPS just doesn't seem to keep up with rocket flight. It never registered over a couple hundred feet, even thought the rocket went to over 800 feet. I never had this issue with the GPS in the previous version of the tracker, though it did seem to lag a bit, so maybe the issue is more pronounced on lower altitude flights.

Next Steps

I've since rebuilt the payload section and am ready for further tests. 

I need to change the receiver so it has an option to show the latest received GPS coordinates. (Or at least bring my computer to the launch.)

I want to conduct further ground tests at a launch site to get a better idea of transmission range on the ground.

Finally, after the above are done, I want to re-design the entire package to include either an altimeter, or perhaps a 10DOF package that includes and altimeter and accelerometer. Also make battery charging more accessible.

I just got a nifty new kit for Christmas -  1.6" fiberglass mini Frenzy from Madcow. I hope to someday adapt this system to fit in that, and launch it with an H or even an I motor and see what it does.